Saturday, 2 March 2013

Simple and Perfect Fish Baked in Salt


If you want the best method for preparing a beautiful fish with minimal effort while preserving that delicate moist inner flesh, have I got the recipe for you.

The other day, I sent my lovely partner off to catch me a fish and he delivered. He brought home a beautiful snapper for us to enjoy that evening, and as happy as I was he didn't come home empty- handed, I felt a hint of sadness. What a privilege it is to be able to catch your fish in the sea and enjoy its sublime, melt-in-your-mouth freshness that very day. Nothing can compare to eating this fresh. I will miss New Zealand terribly.

This method of preparing your fish is common in the Mediterranean so you can be sure it will  be simple and absurdly good. No need to scale your fish, as the scales will work to your advantage keeping the salt from penetrating the fish. There is no question about it, baking your fish in salt will require very little of you but you will get the most in return.

Ingredients:
1 whole fish (i.e. snapper, sea bream, sea bass), gutted but keep scales on!
2 bay leaves
1 kg coarse sea salt/rock salt
herbs (one or any combination these: rosemary, parsley, thyme, tarragon)
splash of water (about 3 tbsp)
  • Preheat oven to 175C/350F
  • Place bay leaves inside the cavity
  • Pour the salt in a bowl, add in the herbs, and then add a splash of cold water 
  • Mix the salt mixture with your hand to achieve a consistency that will allow you to mold it onto your fish
  • Spread a layer of the salt mix on the bottom of your pan
  • Place your fish on top then proceed to build a tight mound of salt all around your fish like a cast, until it is completely covered
  • Place into oven - baking times: 1 lb - 16 min/ 2.5 lb - 27 min/ 4 lb - 35 min
  • Once done take a knife to the top of the spine and cut through the crust, then lift it open like you would the hood of a car
  • Once one side of the fish is uncovered, run the knife along the spine, then peel back the skin
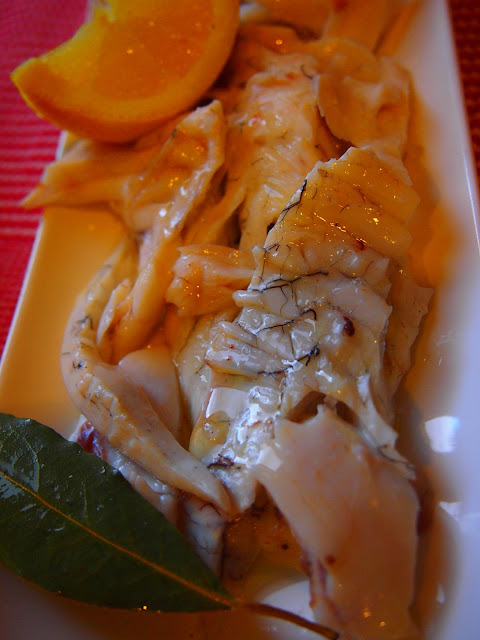
  • Remove the flesh and place on a separate platter, drizzle over with olive oil, salt and lemon
And don't forget the best part, those tender cheeks!

Sunday, 27 January 2013

PRAISE YOUR LAMB AND BRAISE YOUR LAMB SHANKS – Braised Lamb Shanks with Red Wine


You may wonder why I have not as yet posted any lamb recipes. It’s not for the lack of eating lamb, after all I've gorged on more lamb here than I have in my entire life. I suppose that one simply takes for granted what is so easily at one’s disposal. But no more! Lamb deserves to be respected and elevated (NZ lamb burgers are a regular item on McDonald's and other fast food menus here, not exactly what I had in mind) into something special. After all, when you see these beautiful, bashful creatures, frolicking in the green pastures all around, you’d want nothing less than to respect the meat they are providing you with and to make the most of it. So here is one of my most frequently prepared lamb dishes: fall-off –the-bone braised lamb shanks.

Ingredients
(Serves 2)

2 tbsp. olive oil
2 lamb shanks
1 medium onion (coarsely chopped) / 1 leek sliced
2 medium carrots (sliced)
1 celery stick (chopped) optional
½ bottle of red wine
A few sprigs of fresh herbs (thyme, rosemary)
1 cup beef stock (homemade or good quality organic stock is best)
Splash of water
Dash of flour
Parsley for garnish

  • Preheat oven to 160 C/320 F
  • Heat up olive oil in a casserole pot
  • Season your lamb shanks with salt and pepper
  • Brown lamb shanks on all sides
  • Remove from pot and set aside
  • In the same pot add chopped vegetables and sweat them for a few minutes
  • Throw in your herbs
  • Add the lamb shanks back in, stir
  • Pour in the red wine making sure you scrape off the sticky bits from the bottom of the pot
  • Let simmer for 2 minutes so alcohol evaporates
  • Pour in your stock
  • Add a bit of water and bring to a simmer again
  • Cover with lid and pop into the over for 2 hours (turning the shanks over occasionally)
  • Remove lamb shanks and set aside somewhere warm
  • Strain out the vegetables and you are left with the remaining liquid
  • Reduce the liquid by at least half
  • Season to taste
  • Add a dash of flour to thicken the jus a bit, stirring continuously
  • Pour the jus over the lamb shanks and garnish with chopped parsley


Works well with roasted potatoes or simple couscous (tip: for extra flavour  use a boiling cup of mint tea instead of water). 

Thursday, 17 January 2013

SUMMER DESSERTS USING BERRIES AND PLUMS: Rote Grütze, Yoghurt Cake with Plums, and Plum Dumplings


Aah yea, it’s full on summer here in New Zealand and that means that berries and stone fruits are at their very best. Unlike their North American counterparts, if it’s not in season you won’t likely find it on Kiwi market shelves. This is important because in North America it’s easy to forget how fruit ought to really taste: like a reservoir of warm sunshine waiting to expulse its sweet nectar into an eager mouth. If you think I am over-dramatizing then you have not had fruit that’s been grown naturally, picked at its most ripe and juicy state, then eagerly devoured not long after.

I stopped eating fruit once I moved to Canada because it simply didn't have the sweetness and juiciness of the fruit I grew up on in Europe. My only salvation from a fruit-devoid life in Toronto was the odd trip to a strawberry farm or orchard that ultimately left me disappointed, so I stopped going. This was followed by the more recent advent of farmers markets throughout the city (only in summer) where I could pay an arm and a leg for the privilege of eating decent fruit for a few weeks out of the year. I know I sound a bit pessimistic here but I truly feel ripped off.

No need to feel bitter, I tell myself, I am in New Zealand now and I can sweeten my unpractised pallet with bucketfuls of wonderful sweet fruit for a measly few dollars, if that. Well, yesterday I went for a little drive through Kumeu, an area just outside of Auckland, where I went plum picking in a charming orchard and then went strawberry picking on a farm nearby. I came home with more fruit than I knew what to do with.

So what do you do with so much good fruit? Make jams? Sure can, but how to enjoy them before they begin to go off and before you've gorged on them au naturel and your guts plead arête!


Here are three recipes that make the best use of good berries and plums without distorting their splendid flavours:
A German summer berry dessert that I fell in love with when I lived in Heidelberg;
A much loved basic French yoghurt cake that even kids can make with ease;
A European classic plum-filled potato dumpling much loved throughout Austria, Germany, Hungary, Romania, and even North-eastern Italy

Rote Grütze / Red Grits                      
(makes 6 servings)

6 cups of berries (a mix of any 2 or more of these: strawberries, raspberries, blackberries, blueberries, red currents)
½ cup sugar
¼ cup cold water, 2 Tb. corn starch
1 Tb. lemon

  • In a food processor pulse the fruit into small bits, 2 cups at a time (don’t liquidize them). Alternatively you can chop the berries for a chunkier texture.
  • Pour into a wide pan, add the sugar and bring to a simmer on medium heat. Let simmer for a few minutes stirring occasionally.
  • Stir cornstarch in the cold water until dissolved and add to the berries. Reduce heat and continue stirring until thickened, around 3 more minutes.
  • Remove from heat, stir in the lemon juice (and some vanilla but it’s optional)
  • Pour into a bowl, cover with plastic wrap, and leave in refrigerator for 24 hours


This goes best with vanilla sauce but you can also have it with vanilla ice cream, or freshly whipped cream.

Vanilla Sauce

2 cups (combination of cream and milk)
½ cup sugar
4 egg yolks
Vanilla
  • Bring the milk and cream to a simmer then remove from heat to cool down a bit.
  • Meanwhile, whisk the egg yolks and the sugar then pour them into the warm milk stirring continuously with a wooden spoon.
  • Bring back to stove and keep stirring on low heat until sauce begins to thicken, about 12 minutes. Careful not to bring it to a boil as the egg will begin to cook and split
  • Remove from heat, stir in vanilla beans or natural vanilla extract.
  • Pour into a cup and cover with plastic wrap. Refrigerate until ready to serve.

So what to do with the leftover egg whites? This is rather unconventional for this dessert but  it’s a match made in heaven. Just make some meringues and when ready to serve your dessert , layer your Rote Grutze and vanilla sauce on top of the meringue and do enjoy this most refreshing summer dessert.
 
Meringues
Whisk 4 egg whites until stiff. Gradually add 1 cup sugar while whisking until peaked and shiny. Spoon onto baking sheet and put in the oven at 90 C for 3 hours. Turn off heat and leave in oven to cool down.


Gateau au Yaourt aux Prunes / Yoghurt Cake with Plums


(makes 8-10 servings)

1 cup full fat plain or Greek yoghurt
1 cup sugar
A pinch of salt
1 tsp. vanilla extract
1/3 cup vegetable oil
2 eggs
1 2/3 cups flour
1 ½ tsp baking powder
1 tsp baking soda
400 g halved and pitted plums (optional: stew them on low heat with 2 Tb. sugar and a splash of water for 2 minutes until slightly softened)


  • Preheat oven at 180 C. Oil your round cake pan and line with baking paper
  • In a bowl, combine yoghurt, sugar, salt, and vanilla, whisking until smooth
  • Add oil in a steady stream while whisking
  • Add the eggs one by one, whisking 
  • Sift together the flour, baking powder, and baking soda
  • Add the dry ingredients to the yoghurt mixture and whisk to combine
  • Pour the batter into the cake pan
  • Top with plum halves
  • Bake on centre rack for 45 minutes
  • Cool for 20 minutes, dust with icing sugar and serve
Note: This can taste even better the next day but you’ll need to cover it up with tin foil, nothing airtight.


Plum Dumplings/ Galuste cu Prune/ Szilvasgomboc/ Zwetschkenknödel


750g ripe plums (if large cut in half and pit them, if small leave whole)
300 g potatoes
Pinch salt
2 Tb. vegetable oil
100 g flour
1 egg
50 g butter
50 g breadcrumbs
2 Tb. sugar 
Cinnamon (optional)


  • Boil the potatoes skin on about 30 minutes with a bit of salt
  • Once boiled and let cool down a bit, then peel potatoes
  • Grate potatoes into a bowl then incorporate potatoes with the oil
  • Incorporate the egg and flour into the potatoes
  • Bring a large pot of salted water to a boil
  • To make dumplings take a good tablespoon-full of the potato dough and make a rough disc onto the palm of your hand, place the plum or plum half into the centre and roll wrap the dough around it. Shape it into a nice round ball and set down on a plate.
  • To make this process easier and less sticky, flour your hands or dust the dumplings with a bit of flour.
  • Once all your plums have been rolled, reduce the heat of the boiling water to a moderate simmer  then place each dumpling gently into the boiling water.
  • Let them boil for about 12-15 minutes.
  • Meanwhile, melt the butter into a pan at medium heat, once it begins to brown add the breadcrumbs and let them fry for about 3 minutes until golden brown. Stir in about 2 tbsp. sugar.
  • Once dumplings are boiled, remove with slotted spoon. Drain and let cool a few minutes.
  • Roll each dumpling into the buttery breadcrumbs then top with more sugar (and cinnamon) if you like them sweeter.
  • Enjoy warm


Note: if your plums are not sweet enough, sprinkle sugar on them before wrapping them in the dough. 
For a change, try this recipe with apricots.

Saturday, 15 December 2012

Castilian Beef Stew With Prunes and Pine Nuts


“It’s better to have two mouthfuls of beef than seven of potatoes”

As this old expression suggests, the Spaniards consume a lot of meat and judging from the taste and quality of their meats, who can blame them?  Whenever I am in Spain, I consistently forget to eat my veggies so hooked  am I on their abundant and enticingly vast array of meat dishes. Merely reading out a menu is like reciting sweet poetry; the words undulating around my tongue and straight into the pleasure centers of my brain:
Morcilla de cebolla,
Estofado de buey,
Caldereta de cordero

ahhh,  !


Chistorras


Platter of freshly carved Jamon


Callos Madrilenos (Madrid-style tripe)
Morcilla (blood sausage) with quail egg


Flaming little fat sausages

Needless to say, after a few weeks of carnal debauchery, I habitually return home with a raging appetite for salads, and believe me that is grossly out of character.

There is a wonderful stew recipe I came across many years ago in a Spanish cook book and it’s a frequent go-to for me if I have guests coming around and don’t want any surprises. It’s a sure thing and I have yet to meet someone who has not liked this dish. But don’t let its looks deceive you because behind those vibrant colours and textures lies a shamefully easy recipe that packs in mucho sabor.

Ingredients: (serves 4)
Olive oil
2 ½ lb. (or 1 kg) stewing beef (i.e. shin), cut into large chunks and season with salt and pepper
3 carrots, sliced thickly
A dozen small whole pickling onions or shallots, peeled
1 ½ cups of prunes, pitted
2 ½ cups good red wine
2 tbsp. pine nuts, lightly toasted
Chopped parsley
Salt and pepper

·         In a casserole pot, add oil and brown the beef on all sides.
·         Add the rest of the ingredients, save the pine nuts and parsley
·         Cover and cook on low heat on the stovetop for about 2 hours, stirring occasionally
·         When done, sprinkle with pine nuts and parsley


I like to serve this stew with either polenta, thyme roasted potatoes, or even couscous. But if you can’t be bothered, grab a fresh baguette and dig into this sustaining Castilian stew.

Monday, 10 December 2012

ODE TO LOVAGE: Cooking With The "Herb of Love"


My home grown lovage

Have you ever heard of the "Herb of Love"? Nah, not that herb...


It wasn't until I was well into my adult years that I learned the English name for this most aromatic and fanciful herb called Lovage. Like many Romanians, I  grew up on it. Though it has always been a staple in the Romanian kitchen, this herb was in fact widely used in many countries for centuries before it has somehow fallen into disuse. Why this is is a mystery to me as you only have to taste it once to be converted to its distinct charms. So if you’re cooking anything from stews, to fish, or just simple potatoes, (cue the Beatles song): All You Need is Lovage , da da-da-da da.

Lovage transforms foods into something quite special, much like Love. Perhaps, this is why it translates into the “herb of love”. You will see ordinary meals through Lovage-tinted glasses. The first time I cued in on the love connection was while living in Germany. I wanted to make a traditional Romanian sour soup called Ciorba which necessitates the use of lovage to give it its distinctive flavor  So off I went to my weekly farmers market and there it was, green and bushy, looking much like oversized parsley but with an unmistakable aroma. They call it Liebstoekel over there. Ach, meine liebe Liebestoekel! It was such a curious thing to find out it literally translates into “love sticklet”, hah hah, I won’t even go there. You may also find it in some gardening stores in Toronto. It plants easily and does it's own thing, quickly growing into a full bushel given the space. And if this hasn't sold you, Lovage has many practical medicinal properties as well, so you won’t be planting it in vain (I.e. migraines, kidney stones, menstrual disorders, colic, pink eye, flatulence, canker sores, etc.).Here are some ways for you to transform the following dishes with Lovage, as well as a simple potato lovage soup that is certain to warm you up on a cold winter’s night:


Potato Lovage Soup

Ingredients:
            25g butter
            2 medium onions, finely chopped
            500g potatoes, diced
            6-7 tbsp. chopped lovage leaves
            About 1L chicken or vegetable stock


  • Melt butter in a soup pot, add chopped onions and diced potatoes, and gently sauté for 5 min. until soft
  • Add 4 tbsp, chopped lovage leaves and let cook for 1 min.
  • Pour in the stock, bring to boil, then turn down to low heat
  • Cover and simmer for about 30-40 minutes or until potatoes are soft.
  • Puree soup, adding the rest of the fresh chopped lovage, and season with salt and pepper.
  • Return to pot and cook gently for another few minutes, tweaking the seasoning as needed.
  • Serve with croutons and a drizzle of cream. Sublime!


Other ways to incorporate Lovage into your cooking:


  • Incorporate finely chopped lovage leaves into the butter when cooking white fish fillets


  •  Stir in fresh chopped leaves  into your mashed potatoes

  
 ... or potato purées

  • Use the lovage stalks and leaves when cooking red meat stews
  • Incorporate the fresh leaves into your salads (goes well with tomato and onion)
  • Use it in bean or lentils stews
  • Incorporate the fresh leaves into your meatballs


Sunday, 25 November 2012

The Best You've Ever Had: Rustic Bread,Two Ways

Rustic No-Knead Bread and Focaccia Bread


For the sake of this blog entry, I will argue that you can make bread that is so good and so easy you may very well want to live on bread alone.

I have spent most of my life chasing the taste and texture of those round Transylvanian loaves of bread on which I so happily grew up, but alas have had little luck. The vivid memory of both my maternal and paternal grandmothers bringing these massive spherical loaves to their chests and slicing them between their ample pendular apron-donned bosoms is tattooed in my brain. That memory is what bread means to me; comfort, nourishment, and warmth personified. I came close to this ethereal experience once I began making my own bread. There is a German saying that a woman is fit to marry once she has mastered slicing bread up against her chest… as yet, I still cannot slice bread between my bosoms.

Here is the super simple, no knead bread recipe I have happily executed about once a week for the past two years, so you know it’s not just an occasional fling. Just one very important thing: you will need a cast iron pot with a lid!


Rustic No-Knead Bread

Ingredients:
3 cups flour
1 ¼ tsp. salt
 ¼ tsp. dry yeast
1 ½ cups warm water

·         Place the flour, salt, and dry yeast into a big bowl and give it a mix with your fingers.
·         Add the warm water to the bowl of dry ingredients and mix with your hand. No need to knead (hah hah), just use your fingers to bring everything together (this is really just a 10 second affair).

·         Once the dough has come together cover it with a tea towel or plastic wrap and place in a warm place, I use my water closet.
·         Leave to rise for at least 12 hours. I find it practical to do this before I head off to bed, as it only takes 3 minutes to prep, and leave the dough to rise overnight.

·         In the morning I preheat the oven to 250 C or 500 F with the cast iron pot inside.
·         Meanwhile, flip the risen dough out of its bowl onto a clean work surface that has been lightly dusted with flour and flatten it out a bit with your hands.
·         Fold  in the corners of the dough towards the middle, like an envelope, then sprinkle the top with some more flour.

·         Once the oven is as hot as it can get, take out the scorching hot pot and quickly transfer the dough to the pot, folded sides up. Cover with lid and pop back into the oven to bake for 30 minutes, then remove the lid and bake for another 20-25 minutes.


Whenever I cut through the bread's thick crusty exterior and down to its warm and moist interior, I am always astounded by its infinite power to please and comfort like nothing but real hand-made bread can.


Focaccia Bread

 Now that you have mastered a simple no knead bread, you are ready for more advanced level bread-works. I say advanced because there are a few more steps, and a bit of kneading but it’s still damn easy and oh so satisfying. The good thing is, there is less waiting around for the dough to rise.

Ingredients:
500g strong white flour
5g powdered dry yeast
10g salt
325ml warm water
1tbsp. olive oil (plus extra for coating dough)
1 tbsp. chopped rosemary
coarse salt

·         With your hands mix flour, yeast, salt and water in a bowl to form a sticky dough
·         Add olive oil and mix in with fingers
·         Turn dough onto clean counter and knead until smooth (circa 10 min)

·         Shape the dough into a ball and coat with olive oil

·         Cover with plastic wrap and leave to rise in a warm place for 1 hour
·         Once doubled in size, tip over onto the counter and mould it into a rectangle
·         Transfer onto an oiled rectangular baking tray, pull the dough out to fill the tray, and push dough into the corners 
·         Cover tray with towel and leave to rise for half hour
·         Meanwhile, preheat oven to 250 C or 500F
·         When bread has puffed up, poke holes into it with your fingers until the entire rectangle of dough is dimpled
·         Drizzle over with olive oil then sprinkle with coarse salt and chopped rosemary


·        Pop into the oven to bake for 10 minutes, then turn oven down to 200C or 400 F and bake for 10 minutes longer

Enjoy with some Italian cold cuts, cheese or antipasti.