Sunday, 25 November 2012

The Best You've Ever Had: Rustic Bread,Two Ways

Rustic No-Knead Bread and Focaccia Bread


For the sake of this blog entry, I will argue that you can make bread that is so good and so easy you may very well want to live on bread alone.

I have spent most of my life chasing the taste and texture of those round Transylvanian loaves of bread on which I so happily grew up, but alas have had little luck. The vivid memory of both my maternal and paternal grandmothers bringing these massive spherical loaves to their chests and slicing them between their ample pendular apron-donned bosoms is tattooed in my brain. That memory is what bread means to me; comfort, nourishment, and warmth personified. I came close to this ethereal experience once I began making my own bread. There is a German saying that a woman is fit to marry once she has mastered slicing bread up against her chest… as yet, I still cannot slice bread between my bosoms.

Here is the super simple, no knead bread recipe I have happily executed about once a week for the past two years, so you know it’s not just an occasional fling. Just one very important thing: you will need a cast iron pot with a lid!


Rustic No-Knead Bread

Ingredients:
3 cups flour
1 ¼ tsp. salt
 ¼ tsp. dry yeast
1 ½ cups warm water

·         Place the flour, salt, and dry yeast into a big bowl and give it a mix with your fingers.
·         Add the warm water to the bowl of dry ingredients and mix with your hand. No need to knead (hah hah), just use your fingers to bring everything together (this is really just a 10 second affair).

·         Once the dough has come together cover it with a tea towel or plastic wrap and place in a warm place, I use my water closet.
·         Leave to rise for at least 12 hours. I find it practical to do this before I head off to bed, as it only takes 3 minutes to prep, and leave the dough to rise overnight.

·         In the morning I preheat the oven to 250 C or 500 F with the cast iron pot inside.
·         Meanwhile, flip the risen dough out of its bowl onto a clean work surface that has been lightly dusted with flour and flatten it out a bit with your hands.
·         Fold  in the corners of the dough towards the middle, like an envelope, then sprinkle the top with some more flour.

·         Once the oven is as hot as it can get, take out the scorching hot pot and quickly transfer the dough to the pot, folded sides up. Cover with lid and pop back into the oven to bake for 30 minutes, then remove the lid and bake for another 20-25 minutes.


Whenever I cut through the bread's thick crusty exterior and down to its warm and moist interior, I am always astounded by its infinite power to please and comfort like nothing but real hand-made bread can.


Focaccia Bread

 Now that you have mastered a simple no knead bread, you are ready for more advanced level bread-works. I say advanced because there are a few more steps, and a bit of kneading but it’s still damn easy and oh so satisfying. The good thing is, there is less waiting around for the dough to rise.

Ingredients:
500g strong white flour
5g powdered dry yeast
10g salt
325ml warm water
1tbsp. olive oil (plus extra for coating dough)
1 tbsp. chopped rosemary
coarse salt

·         With your hands mix flour, yeast, salt and water in a bowl to form a sticky dough
·         Add olive oil and mix in with fingers
·         Turn dough onto clean counter and knead until smooth (circa 10 min)

·         Shape the dough into a ball and coat with olive oil

·         Cover with plastic wrap and leave to rise in a warm place for 1 hour
·         Once doubled in size, tip over onto the counter and mould it into a rectangle
·         Transfer onto an oiled rectangular baking tray, pull the dough out to fill the tray, and push dough into the corners 
·         Cover tray with towel and leave to rise for half hour
·         Meanwhile, preheat oven to 250 C or 500F
·         When bread has puffed up, poke holes into it with your fingers until the entire rectangle of dough is dimpled
·         Drizzle over with olive oil then sprinkle with coarse salt and chopped rosemary


·        Pop into the oven to bake for 10 minutes, then turn oven down to 200C or 400 F and bake for 10 minutes longer

Enjoy with some Italian cold cuts, cheese or antipasti.

Friday, 19 October 2012

BEING CHEEKY AGAIN – Braised Beef Cheeks

Braised Beef Cheeks

The very first time I ate braised beef cheeks was in a little hard-core Spanish tapas restaurant in Kensington market back in Toronto. The dish was aptly called “tongue and cheek”. I have been eating tongue all my life (insert cheeky remark here), but cheeks were a novelty indeed. Incidentally, my choice of menu items that night had prompted the chef himself to come out into the dining room to see for himself who was ordering his “ballsy” dishes. I must mention, I also had the bull’s testicles, they were absolutely divine.
Oh, I was hopelessly absolutely smitten with the beef cheeks and from that point on every time I saw this beautiful item on a menu, it had my name on it. Le Select restaurant in Toronto does a wonderful job with this dish, so if you have not tried it, I highly recommend you give it a go.
Needless to say, when I spotted beef cheeks in Farro’s meat section I pounced on them like a cat, then looked around nervously to make sure no one had spotted my over-eager display of supermarket hunting prowess. I bought home this beautiful piece of meat not really knowing how to prepare it, so I resorted to my fuzzy recollection of Le Select’s tour de force. I have made it very regularly since and I promise you it is the most unctuous and elegant cut of beef you can imagine.

Ingredients:

(serves 4)
3 TB olive oil
3 .5 to 4 lb of trimmed beef cheeks
2 carrots – cut into medium slices
One roughly chopped onion (alternatively use a leek, or 8 whole shallots)
2 cloves garlic - crushed
1 bottle of red wine (Merlot/Cabernet/Malbec)
A few sprigs fresh thyme 
1 TB butter
Salt and Pepper

  •  First, preheat the oven at 160C or 325 F.
  • Now you will need to trim as much of the fat off the cheeks as you can without cutting away too much of the meat. This can be tricky with cheeks so using a combination of sharp knife and kitchen scissors can be more effective here. 

  • Season the cheeks with salt and pepper. In a large heavy bottomed pot, preferably cast iron, brown the cheeks in the olive oil, then set aside.
  • Throw in the onions, carrots and garlic into the same pot the cheeks were browned in and let cook for about 2-3 minutes.
  • Add the beef cheeks back into the pot, throw in the thyme sprigs and let the flavours marry for a minute. 
  • Pour in the wine making sure all the ingredients are fully covered.
  • Place lid over your pot and pop into the oven for 2.5 -3 hrs. turning the cheeks over now and again.
  • Once done, remove the cheeks and carrot chunks and cover in foil to keep warm.
  • You will be left with a nice rich liquid but to make an extraordinary sauce simmer the liquid on medium heat until reduced to about 1/3.
  • Stir in the butter just before removing from heat. Strain the jus. You now should have a rich and glossy sauce to pour over your cheeks.
Serve with couscous, mashed potatoes, parsnip or celeriac puree. Anything mild or sweet that can absorb the sauce well and compliment the beef cheeks.

I hope you enjoy this French classic as much as I do.

Thursday, 13 September 2012

IT STINGS, IT BURNS, BUT IT’S OH SO GOOD


Stinging Nettle Soup and Nettle Purée with Bacon and Scallops


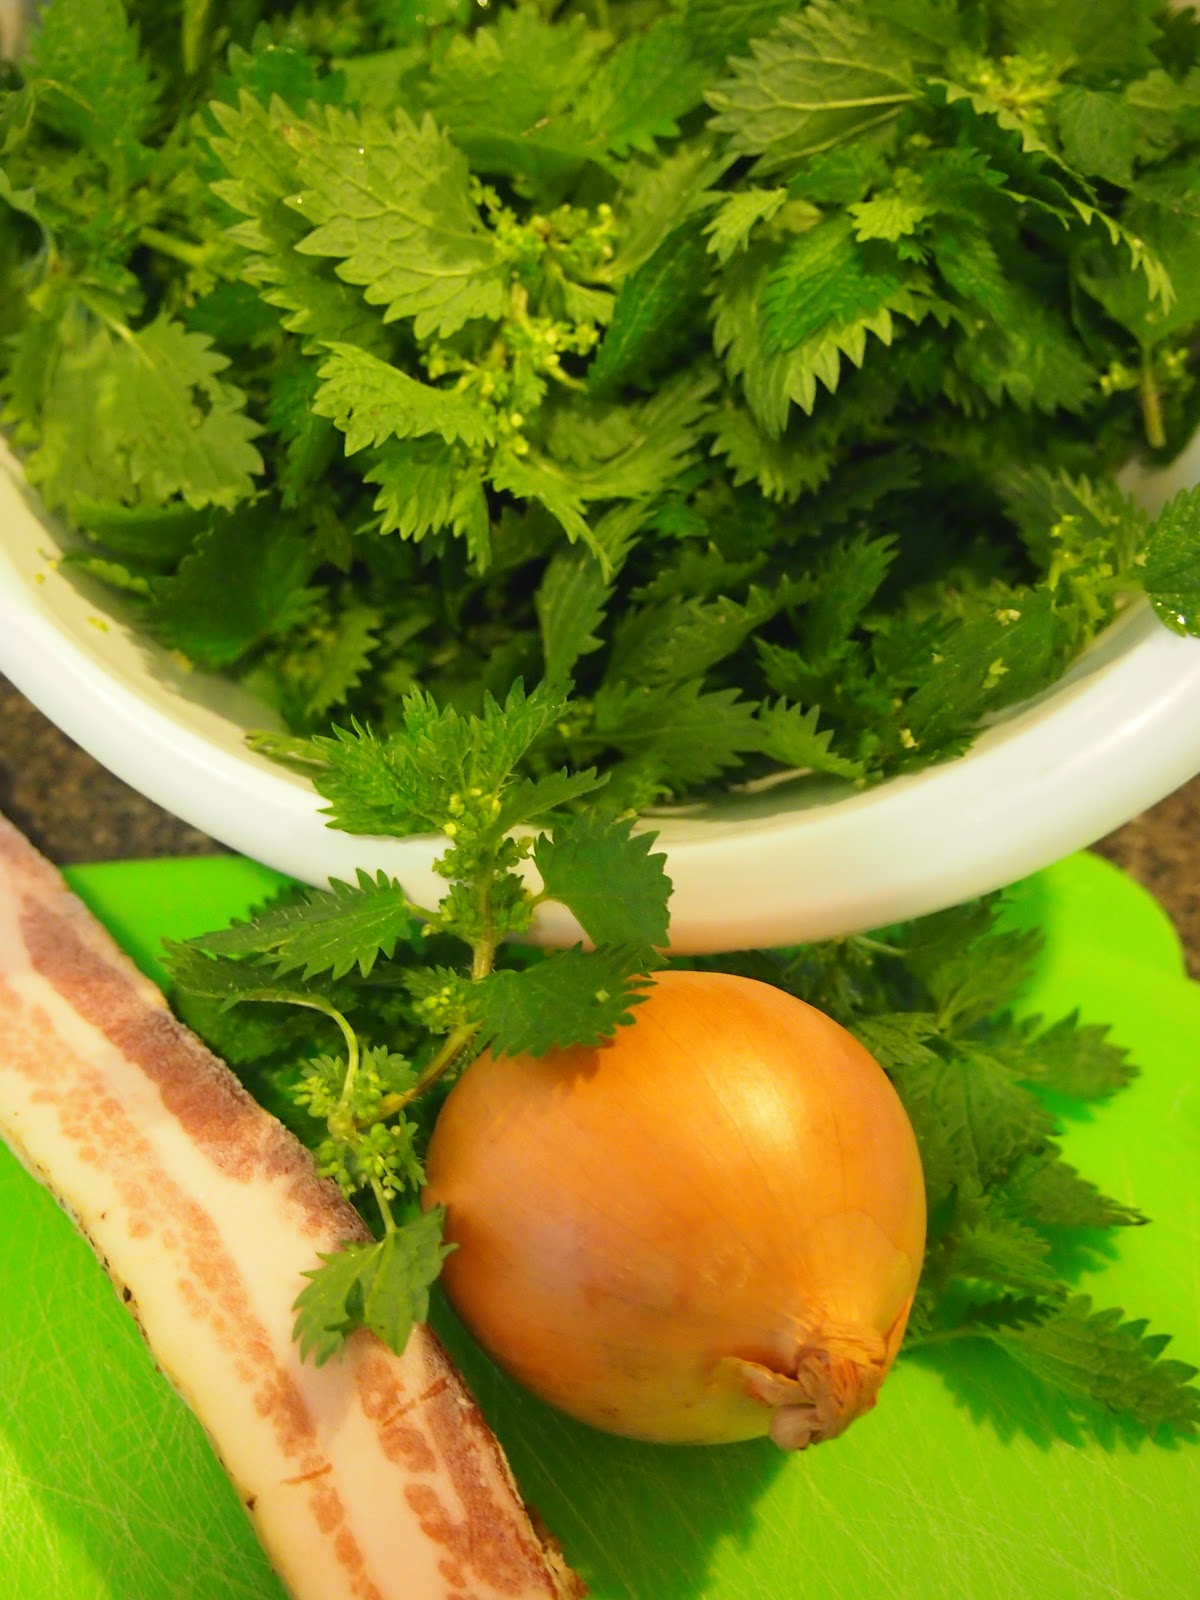
It is Spring here in New Zealand and Spring always compels me to put into practice my belief in eating local seasonal food. Nothing, and I mean nothing, can be more seasonal and more local than stinging nettles found in some park nearby. Most people might only recognize stinging nettles as pesky plants that will cause you some serious discomfort when touched. However not many know that stinging nettles are not only edible but sublime. In some countries, usually in countries where people have no other option but to eat seasonal foods, these are a highly anticipated healthy Spring delicacy. Sadly, in affluent countries, the incentive to find seasonal foods is nil as there is no real demarcation of seasonality in supermarkets.


I grew up eating nettle soup in Romania. After a long Winter in the absence of fresh greens and vegetables (we pickle pretty much everything we can get our hands on in the Autumn to keep us fed through the Winter months), nothing gives your vitamin and mineral deprived body a better kick-start than fresh young nettle leaves. I can go on and on about all their various health benefits but I’ll name just few here; nettles have copious amounts of iron, vitamins A and C, potassium, manganese, calcium and are rich in protein.


This is in no way a rant on being environmentally responsible or being all health-nutty, these are just the side benefits of eating this delightful leafy green. I am first and foremost keen on flavour and it just so happens that local seasonal food has the best flavours. Nettles have the intense taste of spring, a flavour you simply must try and are worth any small effort you make trying to track them down and pick these prickly little suckers.

As I mentioned on an earlier post, I love to scavenge for my food, I look forward to it and come Spring I am like a kid in a candy store. Armed with a plastic bag and my pink rubber cleaning gloves I venture out into nature’s bounty.


Where and when to find them (100% guaranteed):
Auckland – Cornwall Park near the Archery grounds - September/October
Toronto – Riverdale Farms along Lower Road – April/May


My stinging nettle stash , Cornwall Park


Tips:


  •  Pick only young shoots
  •  Use gloves at all times when     
  •  handling the nettles
  •  Despite their stinging disposition when  raw, soaking nettles in water or cooking them will remove the stinging chemicals from the plant, which allows them to be handled and eaten without incidence of stinging.


Now that you've picked your leaves, and washed them thoroughly, it’s time to make magic. Here are two simple recipes for nettles. The first is the Romanian soup recipe I grew up on and was passed down to me from my mother. The second is a nettle purée and scallop entrée I developed as a way to celebrate the best of Spring.


Stinging Nettle Soup / “Ciorba de Urzici”

Ingredients:


A large bowl-full of nettle leaves
1 Onion, finely chopped
100 g Bacon or pancetta, chopped into cubes
1 Egg yolk
½ Lemon
2 Tb. sour cream


  • Sauté the bacon and onions in a soup pot until the bacon is browned and  onions are translucent
  • Add water, bring to a boil, then salt the water
  • Add the nettle leaves
  • Let simmer for 1 hour
  • Turn off the heat.
  • In a separate bowl, lightly beat an egg yolk and the juice of half a large               lemon, then take a ladle-full of the soup broth and add it to the bowl with the yolk, whisk it lightly and pour it back into the soup pot
  • In a separate bowl, whisk the sour cream and a ladle-full of the soup broth and then add it back  to the soup.

Enjoy with a crusty slice of fresh bread!


Nettle Purée with Bacon and Scallops

Ingredients:


1 cup of vegetable stock and 1 cup of water (or 2 shallots finely chopped and 2 cups of water)
3 cups of young stinging nettle leaves
½ a potato, chopped in mid-sized cubes
Lemon to taste
2 Tb. butter
2 wide slices of bacon
A dozen scallops


·       


  • In a small pot heat up 1.5 cups vegetable stock. If you have not made any just sauté some chopped shallots and then add 1.5 cups of water which you will bring to a boil. This second option will yield a subtler flavour but is good nevertheless.
  • Throw in half a chopped potato, add about 3 cups of nettles, turn down the heat and let simmer until the liquid is reduced significantly.
  • Once a thicker consistency is reached, season with salt, pepper. Take this to a blender and puree. Here you may add some butter and squeeze a bit of lemon to your desired taste.
  • Transfer the purée back to the pot and continue simmering it for another few minutes, stirring occasionally. Adjust seasoning to taste.
  • Meanwhile, stick a couple of slices of bacon on a baking sheet and pop them into the oven until crisp.
  • Then fry some salt and pepper seasoned scallops in hot butter. Only a minute or two on each side depending on their size. I like to squeeze some lemon into the butter sauce so I can drizzle it over the scallops and puree afterwards.


  • Make a little pool of nettle purée on your platter, set the bacon on top and then line the scallops on top of the bacon.
  • The flavours here go so well together particularly, when you have some crusty bread to scoop the purée up with. Enjoy as a first course or light lunch.

Monday, 3 September 2012

ALLORA, WHY GET ANGRY WHEN YOU CAN GET ARRABBIATA?


Arrabbiata and Other Tomato Pasta Sauce Basics


My Spaghetti all'Arrabbiata (but if you're a purist use Penne)

Years ago when I lived in Germany, I used to travel to Italy incessantly. When not heading down to bella Italia, we had Italia head up to us. This was an informative period for me. It was the time I learned how real pasta dishes ought to taste and how to make them. Mostly I learned it from my ex who lived in Italy at one time and who had various Italian friends coming and going, imparting their pasta know-how.  Out of all the things I learned to make in that period of my life, nothing has given me more mileage than the knowledge of how to prepare various pasta dishes.


So when you find yourself, as one often does, with nothing in the refrigerator, when you are tired from a long day of work, when you have impromptu guests coming over, or when you’re just lazy, you can count on penne all’arrabbiata or bucatini all’amatriciana just to name a couple, to save the day.

Arrabbiata means angry (fem.) in Italian because this sugo or sauce is made with hot chillies. I will focus on the arrabbiata sauce here because it is a good example of a basic tomato-based sugo.  This is a very easy dish but it’s the little things that make it magical. So here are a couple of tips to keep in mind if you want your pasta dish to taste like the real thing:

1.      Use only Italian passata, or canned pomodori pelati/peeled tomatoes. Passata di pomodoro refers to tomatoes that have been "passed" through a sieve to remove seeds and lumps. In this form, it is generally sold in bottles. It is uncooked and contains no additives. Do not make the mistake of using tomato paste or prepared tomato sauce. I know local is better, and then there’s the carbon footprint dilemma, and so on, but trust me and make an exception with the tomatoes. It really tastes infinitely better so look for the Made in Italy seal.

Pomodori pelati, passata, and peperoncini

2.      The best chillies to use are these little hot dried bird's eye chillies. If using chilli flakes, it would take quite a lot of them to bring in the heat. You can also use fresh bird eye chillies. The important thing to remember is that the chillies have to be red and very hot so it takes only a few to render a spicy sauce without altering the taste.
Fresh bird's eye chillies
Dried hot peperoncini


3.      Whatever the cooking time instructions are on the pasta box, take it out half a minute earlier because you will need to transfer the pasta to the sauce pan where the pasta will continue cooking.


Ingredients (2 portions):
  • 1 large garlic clove or 2 small cloves, chopped
  • Olive oil, 1tbsp
  • Pepperoncini – dried bird eye chillies (I use 2 or 3 as they pack in a lot of heat)
  • 2/3 of a bottle of tomato Passata or 1 can of pomodori pelati (skinned whole tomatoes)
  • 250 g Penne Rigate or Spaghetti (again, use an Italian brand like Barilla or De Cecco)


Making the Sugo all’Arrabbiata:

·         Heat up the olive oil in a skillet and then sauté the chopped garlic and crushed peperoncini for about half a minute

·         Pour in the tomato passsata or canned peeled tomatoes accompanied by about a half a cup of water. If using the whole peeled tomatoes let them cook for about 15 minutes first before mashing them down with a wooden spoon for a smooth texture.

·         Add salt to taste and let the sauce simmer on low heat for about 35 to 40 minutes so that it has had a chance to reduce and become thicker and more concentrated flavour.

·         Place the pasta in a large pot of boiling and well salted water. Remove the pasta from the pot just short of the recommended cooking time and transfer it to the pan where the sauce is cooking. Be sure not to drain the pasta completely as you need to bring with it some of the starchy water it has been cooking in (about 2-3 tbsp.)

·         Stir the pasta through the sauce making sure it’s covered well, about half and minute. This process will ensure the pasta and sauce are cooking and emulsifying together.
·         Take off the heat and transfer to plates. Garnish with grated Parmigiano Regiano, olive oil, chopped flat parsley, and then tuck into this hot little number.


OTHER TOMATO SAUCE VARIATIONS:

As mentioned earlier, using this sauce as a base you can make a variety of other pasta dishes (just be sure to cut back on the chillies). For example, add 2 tbsps. of ricotta cheese towards the end of the cooking time of your tomato sauce. Alternatively, you can add some cream at the end for a creamy rose sauce. Or you can easily make one of my favorites, Spaghetti all’ Amatriciana by starting out the dish by frying up a handful of diced pancetta, guanciale (see Real Cheeky Carbonara blog post)  or double smoked bacon, then continuing in the same way as above with the garlic and tomato passata.

Farfalle or bow-tie pasta with tomato ricotta sauce

Wednesday, 15 August 2012

Quiche Me Twice, I'm European!


Cultural norms are so unfixed and so relative that I often find myself in inevitably awkward situations, particularly in countries where there are no strict set of social norms (generally in the New World), such as greeting people via kisses on the cheek. I cannot count the times I reached for the second kiss only to be left hanging or alternatively, going in for the other cheek and realizing the receiver has already moved on.  When in Canada or in New Zealand I still have not figured out what is the preferred greeting, one kiss on the cheek or two, or none? I miss the clarity of European customs where one knows exactly what to expect in the respective country. No matter, I shall do it my way and stick to two of everything, like it or not.

Where am I going with this you may ask? I am about to talk about quiche and I don’t want to stick to just one kind. I love it far too much and you know if I make two types of quiches for you, I must be fond of you.

As I said, I love quiche, but for years now I had the worst luck trying to find a decent one, let alone an edible one. They often tend to be soggy and tasteless. Why? What’s so hard about making a proper quiche? After years of hesitantly ordering quiche in various cafés and restaurants (the Quiche Lorraine served for brunch at Le Select in Toronto is an exception) I have given up on the hope of finding something I like, so a few years ago I started making my own. The heavenly aroma wafting through your home is worth the small effort, trust me.

Maronen
My two favorite quiches are Quiche Lorraine and Mushroom Quiche.  Quiche Lorraine is a classic, made with bacon or lardons, while the mushroom quiche is really my own thing. I like to forage, did I tell you? Yea, there is nothing tastier or more rewarding than food that you’ve picked yourself. Oh yea, and I am a bit of a Fungophile as well. I love picking mushrooms, it reminds me of long Autumn walks through the Odenwald, a forest range that extends into the Heidelberg area in Germany where I used to live, with basket and knife in hand trying to spot Steinpilze (Porcini mushrooms) and Maronen (Bay Bolete mushrooms). These are some of the tastiest mushrooms there are. Absolutely divine in a stew!

I had a blast this fall in Auckland trying to find mushrooms but too nervous to pick them as I am unfamiliar with mushrooms in this part of the world. Luckily, I live near the beautiful Cornwall Park and there is a sweet spot in the olive grove where I find (safe-to-eat and easily-identifiable) Wood Ear mushrooms found growing happily on rotting wood. I made many a dish using the Wood Ear which is mostly valued for its texture and health properties - A. auricula-judae has antitumour, hypoglycemic, anticoagulant and cholesterol-lowering properties.  I particularly like using in as part of the mélange of mushrooms in my quiches.

Wood Ear Mushrooms

I have been away from New Zealand for the winter and now that I am back at its tail-end I have been surprised to find that my wood ear mushrooms have had a second wind. Normally they are ripe for the picking in the autumn but on my walk through the park the other day I found them alive and well. How could I resist?


Making the Pastry Base:

·         In a food processor pulse: 200g cold butter (cubed), 400g flour, pinch of salt, until the pastry begins to clump together, kind of like loose moist sand

·         In a cold bowl: pour in the contents of food processor and form a well, then pour in 100ml of water and mix gradually by hand

·         Sprinkle a clean surface with flour and transfer the loose pastry mixture to it for light kneading, ultimately forming a ball.

·         Cut ball in half and re-form both halves into balls

·         Cover them with plastic wraps and place in refrigerator for at least 30 minutes, or store in freezer if not using it immediately. The pastry will make two quiches.


Quiche Loraine

·         In a pan, melt 10g of butter then brown about 100g cubed bacon, pancetta or speck

·         Once the bacon is fried use some of the remaining fat in the pan to oil the inside of your quiche pan using a paper towel

·         Roll out the ball of pastry on a floured surface so that it is about 2.5 inches wider than the diameter of your pan.

·         Place the rolled out pastry into the oiled pan pushing securely against the edge of the pan.

·         Using a fork, prick holes into the bottom of the pastry.

          Distribute the cooked bacon and its oil over the surface of your pastry

          In a bowl whisk: 3 eggs, 200g crème fraiche (alternatively use table cream), salt and pepper to taste, and a sprinkle of nutmeg

         Pour the custard into the pastry-lined form
     Grate on a bit of Edam or Gruyere cheese

·         Place the pan in a preheated oven at 185 C or 360 F for about 50 minutes (you should check that the top of the quiche does not burn).


Mushroom Quiche:

·         In a pan, melt a tablespoon of butter and add some finely leek or chopped shallot, a bunch of sliced melange of mushrooms (ie. Cremini, Oyster, and Wood Ear), and sauté until all are softened and cooked through. Half way through throw in some chopped herbs like rosemary, thyme or sage, or even better, all three.

·         Season well with salt and pepper.

·         In a bowl whisk: 3 eggs, 200g crème fraiche (alternatively use table cream), salt and pepper to taste, and a sprinkle of nutmeg

·         Pour the custard into the pastry-lined form

·         Place the pan in a preheated oven at 185 C or 360 F for about 50 minutes (you should check that the top of the quiche does not burn).
Now, take a moment and relish the heavenly aroma that your home has been anointed in, take the quiche out of the oven, and let cool down a bit before slicing.

Mwah, mwah. Enjoy!